 |
| Ultramarine with Missile Launcher. |
Ten artykuł to druga część poprzedniego materiału. Proszę przeczytaj najpierw część pierwszą ponieważ jest to jego bezpośrednia kontynuacja.
OK zabieramy się do pracy....
This article is the second part of the previous material. Please read the first part because it is the direct continuation.
OK get to work ....
OK get to work ....
5.Zniszczenia pancerza, zadrapania farby - to jest mój własny szybki sposób, bez większych fajerwerków. Przy pomocy dużego pędzla oraz farby Leadbelcher (Boltgun Metal), praktycznie suchym pędzlem z niewielką ilością farby wcieramy ją w miejsca gdzie pancerz ma być zniszczony. Jeśli chcesz by jakieś elementy wyróżniały się bardziej to po prostu dociśnij mocniej pędzel. Efekt ten widoczny jest na wszystkich zdjęciach w tym artykule.
The destruction of the armor, paint scratches - this is my own quick way, without major fireworks. Using a large brush and paint Leadbelcher (Boltgun Metal), almost dry brush with a little paint rub it in a place where the armor is to be destroyed. If you want some elements stand out more just push the brush harder. This effect is visible in all images in this article.
6.Blacklining - używając małego pędzla oraz farby typu wash, Nuln Oil (Badab Black), obrysuj wszystkie elementy figurki cienką czarna kreską. Przy odrobinie wprawy nie zajmie Ci to wiele czasu, a nada figurce dużej wyrazistości.
Blacklining - using a small brush and wash paint, Nuln Oil (Badab Black), draw all elements of the figure qith a thin black line. With a little practice it will not take you much time and the statue will get high visibility.
Blacklining - using a small brush and wash paint, Nuln Oil (Badab Black), draw all elements of the figure qith a thin black line. With a little practice it will not take you much time and the statue will get high visibility.
7.Krawędziowanie - używając małego pędzla oraz rozwodnionej farby Celestra Gray (Astronomican Grey) rozjaśnij wszystkie krawędzie Power Armor. Na tej samej zasadzie rozjaśnij krawędzie wszystkich złotych elementów (Auric Armour Gold (Burnished Gold)) kolorem Runefang Steel (Mithril Silver). Wszystkie techniki z punktów 5, 6 i 7 widoczne są na poniższym zdjęciu z Power Fist.
Edges - using a small brush and paint diluted Celestra Gray (Astronomican Grey) enlighten all the edges of Power Armor. In the same way lighten the edges of all the gold pieces (Auric Armour Gold (Burnished Gold)) with color Runefang Steel (Mithril Silver). All the techniques of the points 5, 6 and 7 are shown in the picture with Power Fist.
Edges - using a small brush and paint diluted Celestra Gray (Astronomican Grey) enlighten all the edges of Power Armor. In the same way lighten the edges of all the gold pieces (Auric Armour Gold (Burnished Gold)) with color Runefang Steel (Mithril Silver). All the techniques of the points 5, 6 and 7 are shown in the picture with Power Fist.
 |
| The techniques described in sections 5,6 and 7. |
8. Broń - pomaluj całą broń kolorem Abaddon Black (Chaos Black). Wszelkie metalowe elementy jak np. magazynki pomaluj kolorem Ironbreaker (Chainmail). Farbą typu wash Agrax Earthshade (Devlan Mud) pokryj metalowe elementy tak by spłynęła do zagłębień. Po wyschnięciu rozjasnij niektóre wystające srebrne elementy kolorem Runefang Steel (Mithril Silver). Możęsz teraz domalować detale typu żółte oznaczenia na broni. Na koniec rozwodnioną farbą Celestra Gray (Astronomican Grey) rozjaśnij wszystkie czarne krawędzie broni podobnie jak uczyniłeś to z POwer Armor w punkcie 7.
Weapons - all weapons paint with Abaddon Black color (Chaos Black). All metal parts such as magazines paint with color Ironbreaker (Chainmail). Oncce done, use wash-type paint Agrax Earthshade (Devlan Mud) to coat the metal parts in such way that it flows into the gaps. After drying, lighten some prominent silver elements with the color Runefang Steel (Mithril Silver). Now you can add some details like yellow markings on the weapons. At the end, with the use of diluted paint Celestra Gray (Astronomican Grey) enlighten all black edges of the weapon just as you did it with the Power Armor in Section 7
 |
| Weapon 1 |
 |
| Weapon 2 |
9. "Bruding"- aby nadać realizmu naszemu modelowi możemy przybrudzić Power Armor. Techniką suchego pędzla oraz farbą Steel Legion Drab (Graveyard Earth) pokryj nogi naszego Space Marine.
Dirt - to give realism to our model, we can smudge the Power Armor. With a dry brush technique and paint Steel Legion Drab (Graveyard Earth) coat the legs of our Space Marine.
Dirt - to give realism to our model, we can smudge the Power Armor. With a dry brush technique and paint Steel Legion Drab (Graveyard Earth) coat the legs of our Space Marine.
 |
| Dirt |
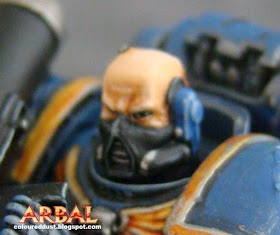
Details - The final step is to paint all kinds of details, such as Shoulder Pads, Purity Seals, or face. Face painting as such is a subject for a separate article.
 |
| Face 1 |
 |
| Face 2 |
11. Oczy w hełmie malujemy kolorem czerwonym rozjaśniając je w kierunku "nosa". W samym kąciku oka dodajemy małą białą kropkę. Dodatkowo możesz pomalować oko błyszczącym lakierem by odróżniały się mocniej od reszty modelu.
Eyes in the helmet we paint in red and highliten them in the "nose" direction. In the corner of the eye add a small white dot. Additionally, you can paint the eyes with gloss varnish to distinguish them from the rest of the model.
 |
| Eyes |
12. Podstawka - to już osobny temat i można wykonać ją na wiele, różnych sposobów. Pamiętaj by podstawki były spójne wyglądem w całej Twojej armii.
Jesli chcesz bym rozwinął bardziej szczegółowo któryś z etapów malowania, to proszę pozostaw informację w komentarzu.
That's all :)
If you want me developed in more detail some of the stages of painting, please leave the information in the comment.
Have fun painting,
ARBAL
