The destructive power of time...

Hello! I hope you've noticed a little activity on my blog recently :) After the last podcast with Matheo, my desire for our hobby returned (I know, I know it again, maybe now I'll succeed). I started by tidying up my workshop, reorganizing my workspace and cleaning my figurine cabinet. While cleaning the display case, I noticed changes in several models due to the passage of time (some models are over 12 years old). In the article below, we will look at how time can affect the modeling effects, paints, varnishes, etc. used on the miniatures. It will also be a verification of several of my articles and the methods described in them. I invite you to read and exchange experiences.
Witajcie! Mam nadzieję, że zauważyliście niewielką aktywność na moim blogu w ostatnim czasie :) Po ostatnim podcaście z Matheo wróciła mi chęć do naszego hobby (wiem wiem to już kolejny raz, może teraz się uda). Rozpocząłem od porządków w moim warsztacie, reorganizacji miejsca pracy i czyszczenia gablotki z figurkami. W czasie porządków w gablocie zauważyłem na kilku modelach zmiany spowodowane upływem czasu (część modeli ma już ponad 12 lat). W poniższym artykule przyjrzymy się jak czas może wpłynąć na zastosowane na figurkach efekty modelarskie, farby, lakiery itp. Będzie to również weryfikacja kilku moich artykułów i opisanych w nich metod. Zapraszam do lektury i wymiany doświadczeń.
Please remember that all of this I give you for free. It would be so nice if you leave a mark in the form of comment and share the SBS to your friends. If you want to buy me a coffee or a beer the "DONATE" button is below.
Pamiętajcie, że wszystko to daję Wam całkowicie za darmo. Będzie mi więc miło jeśli pozostawicie po sobie ślad w postaci komentarza i udostępnicie ten SBS znajomym. Jeśli chcecie postawić mi kawę lub piwo przycisk "DONATE" znajduje się poniżej.
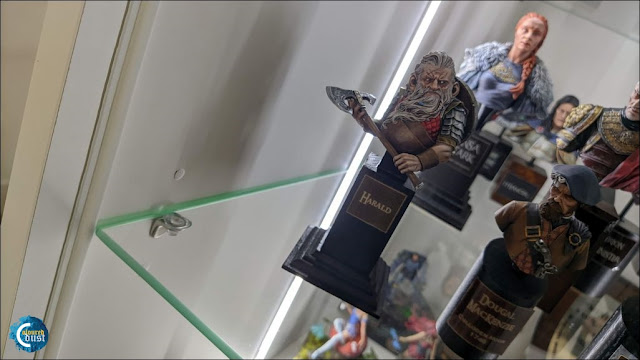
The important information is that my display case for miniatures is placed in the room so that sunlight does not fall on it. During the day, the models are not illuminated directly by the sun. In addition, I used simple self-adhesive gaskets in the display case to prevent large amounts of dust from getting inside. This is not a 100% solution, but I have to admit that it works great. After three years without cleaning (sic!) the models are not dusty. Only the glass shelves needed to be wiped. This is quite important information in terms of the fact that we will be looking at the aging process of paints or modeling effects on models.
Istotną informacją jest, iż moja gablota na figurki jest tak ustawiona w pokoju, że nie pada na nią światło słoneczne. W ciągu doby modele nie są oświetlone bezpośrednio przez słońce. Dodatkowo w gablocie zastosowałem proste uszczelki samoprzylepne aby zapobiec przedostawaniu się do środka dużej ilości kurzu. Nie jest to rozwiązanie 100% ale musze przyznać, że sprawdza się wyśmienicie. Po trzech latach bez czyszczenia (sic!) modele nie są zakurzone. Przetarcia wymagały jedynie szklane półki. Są to dość istotne informacje pod kątem tego, że będziemy się przyglądać procesowi starzenia się farb czy efektów modelarskich na modelach.
 |
| Self-adhesive gaskets in the display case. |
VARNISH
LAKIER
Generally, I do not use varnishes to protect models. In my opinion, this only makes sense on miniatures intended for gaming, because it protects them from destruction. On my works, however, I used mainly satin varnishes (leather elements) and glossy varnishes (metal elements, eyes) to increase realism. These were mainly Vallejo acrylic varnishes. I didn't notice any changes on the painted elements of the figures. The varnish did not yellow or change its visual properties.
Generalnie nie używam lakierów do zabezpieczania modeli. Moim zdaniem ma to sens jedynie na figurkach przeznaczonych do grani, ponieważ chroni je przed zniszczeniem. Na swoich pracach używałem jednak lakierów głównie satynowych (elementy skórzane) i lakierów z połyskiem (elementy metalowe, oczy) aby zwiększyć realizm. Były to głównie lakiery akrylowe firmy Vallejo. Nie zauważyłem żadnych zmian na polakierowanych elementach figurek. Lakier nie zżółkł ani nie zmienił swoich właściwości wizualnych.
LABELS FOR BASES
PLAKIETKI NA PODSTAWKI
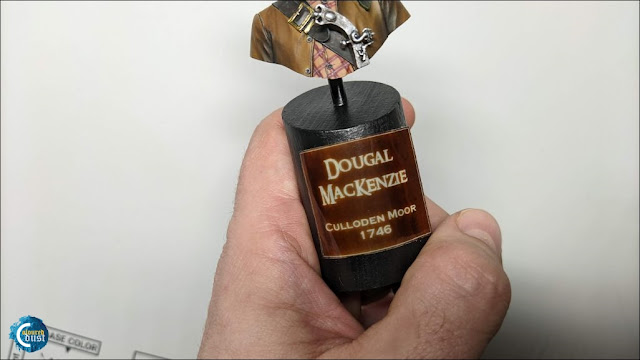
On all my models, I used the method described on this blog in year 2015, to make pedestal/base badges. Years later, it turned out what mistakes can be made using this method. Two problems arose.
Na wszystkich moich modelach stosowałem opisaną na tym blogu metodę w 2015 roku, w celu wykonania plakietek na piedestały/podstawki. Po latach okazało się jakie błędy można popełnić używając ten sposób. Problemy pojawiły się dwa.
The first problem is the round pedestals. After some time, the used double-sided adhesive tape stops fulfilling its task and the badges peel off.
Pierwszy problem to okrągłe piedestały. Po pewnym czasie stosowana dwustronna taśma klejąca przestaje spełniac swoje zadanie i plakietki odklejają się.
The second problem is the print quality. All my badges were printed on exactly the same specialty printing foil. Badges that were printed on a laser printer retained their color after years. Badges printed on an inkjet printer but with the use of high-quality ink (original cartridges with ink from the printer manufacturer, e.g. HP, Canon) also retained their color. The problem turned out to be badges printed with cheap, substitute ink. These printouts have lost their original color, faded, or turned yellow.
Drugi problem to jakość wydruku. Wszystkie moje plakietki były drukowane na dokładnie tej samej specjalistycznej folii do wydruków. Plakietki które były drukowane na drukarce laserowej zachowały swój kolor po latach. Plakietki drukowane na drukarce atramentowej ale z zastosowaniem wysokiej jakości tuszu (oryginalne wkłady z tuszem producenta drukarki np. HP, Canon) również zachowały kolor. Problemem okazały się plakietki drukowane z użyciem taniego, zastępczego tuszu. Te wydruki straciły początkową barwę, wyblakły lub pożółkły.
 |
| 7 years later. |
 |
| 6 years later. |
 |
| 6 years later. |
SNOW EFFECT
EFEKT ŚNIEGU
In 2014, I described a method of making realistic snow on my blog. Previously, I used a similar "mixture" based on baking soda. Unfortunately, baking soda has not stood the test of time. Most of the snow just disappeared.
W 2014 roku opisałem na moim blogu metodę wykonania realistycznego śniegu. Wcześniej stosowałem podobną "miksturę" opartą na sodzie oczyszczonej. Niestety soda oczyszczona nie przetrwała próby czasu. Większość śniegu po prostu zniknęła.
 |
| Original verision from 2015. You can see a lot of snow. |
 |
| 7 years later. |
 |
| 7 years later. |
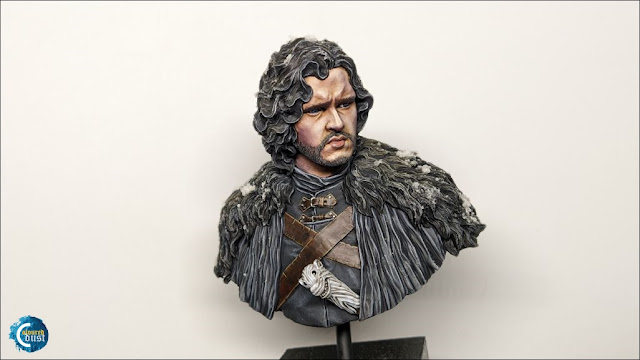
All that's left is snow made of crushed glass and an effect from PK-PRO. You can see it in the Jon Snow, bust I painted 8 years ago.
Pozostał jedynie śnieg zrobiony z pokruszonego szkła i efektu od PK-PRO. Widać to na popiersiu Jon Snow, które pomalowałem 8 lat temu.
 |
| 8 years later. |
PAINTS
FARBY
I have used paints from many manufacturers over the years. Mostly, however, these were Vallejo paints and effects. After more than 12 years, I have not noticed any negative color changes, paint flaking, etc.
Przez wiele lat używałem farb wielu producentów. Głównie były to jednak farby i efekty firmy Vallejo. Po ponad 12 latach nie zauważyłem żadnych negatywnych zmian kolorów, łuszczenia się farb itp.
WATER EFFECTS
Efekty wody
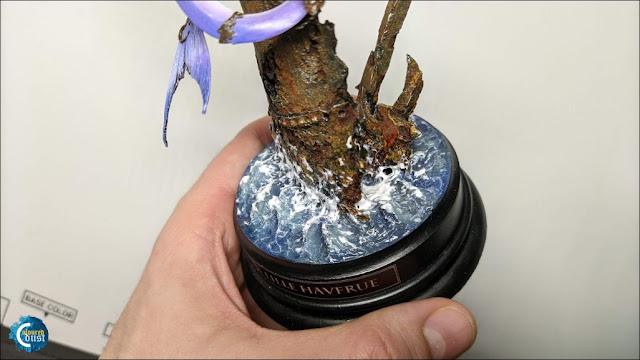
As with the paints, I used Vallejo products to create the water effects on my bases. The oldest coaster of this type in my collection is 9 years old at the time of writing this article. I haven't noticed any negative changes on bases made with water effects.
Tak samo jak w przypadku farbek do stworzenia efektów wody na moich podstawkach używałem produktów firmy Vallejo. Najstarsza tego typu podstawka w moje kolekcji ma w chwili pisania tego artykułu 9 lat. Nie zauważyłem żadnych negatywnych zmian na podstawkach wykonanych z użyciem efektów wody.
 |
| 9 years later it's still the same. |
 |
| 7 years later it's still the same. |
NATURAL ELEMENTS ON SCENIC BASES
NATURALNE ELEMENTY NA PODSTAWKACH SCENICZNYCH
In the past, I wrote two guides where I used natural elements for stage bases. Then I used moss and leaves. These articles were of great interest. A lot of your comments are a discussion about whether the moss and leaves will not lose their colors after some time?
W przeszłości napisałem dwa poradniki, w których wykorzystywałem naturalne elementy do podstawek scenicznych. Użyłem wtedy mech i liście. Te artykuły cieszyły się dużym zainteresowaniem. Spora ilość waszych komentarzy to dyskusja o tym, czy mech oraz liście nie stracą kolorów po pewnym czasie?
After 6 years of using the moss, I can say that it has lost its natural green color. In the pictures below you can see clear yellow-brown tufts of moss. You suggested in the comments that it depends on the species of moss. Importantly, the moss used at that time was not fixed in glycerin. The miniature leaves, however, were fixed in glycerin and did not lose their color.
Po 6 latach od użycia mchu mogę powiedzieć, że stracił swój naturalny zielony kolor. Na zdjęciach poniżej widzicie wyraźne żółto-brązowe kępki mchu. Sugerowaliście w komentarzach, że jest to zależne od gatunku mchu. Co istotne użyty wtedy mech nie był utrwalony w glicerynie. Wykonane natomiast miniaturowe listki były utrwalone w glicerynie i nie straciły koloru.
 |
| 6 years later. |
 |
| 6 years leater |
 |
| Original version from 2013. |
 |
| 9 years later. |
SUMMARY
PODSUMOWANIE
If you read to the end, you may ask yourself, what was the purpose of writing this article? I wanted to show you how our figurines, standing in a display case, can get old. Show how time is merciless. You yourself, dear readers of this blog, have been discussing in the comments of these articles about what will happen to these effects in a few years. The above post is the answer to those questions. It also showed me personally that several of the tutorials I've created in the past need refreshing and adding lessons learned over the years (which I will do soon). I also need to think about how to improve/correct these figures. I hope this post will be helpful for you. I also invite you to exchange your observations in the comments below.
Jeśli doczytaliście do końca to możecie zadać sobie pytanie, jaki był cel napisania tego artykułu? Chciałem Wam pokazać jak nasze figurki, stojąc w gablocie mogą się zestarzeć. Pokazać jak czas jest bezlitosny. Sami zresztą, drodzy czytelnicy tego bloga, prowadziliście dyskusje w komentarzach tych artykułów o tym co stanie się z tymi efektami za kilka lat. Powyższy wpis jest odpowiedzią na tamte pytania. Pokazało mi to również osobiście, że kilka z poradników jakie stworzyłem w przeszłości wymagają odświeżenia i dodania wniosków jakie wypłynęły po latach (co wkrótce uczynię). Muszę się również zastanowić jak poprawić/naprawić te figurki. Mam nadzieję, że ten wpis będzie dla Was pomocny. Zapraszam również do wymiany spostrzeżeń w komentarzach poniżej.
Have fun painting,
Michał "ARBAL" Walczak


